Welcome to my food blog!

Featuring delicious recipes made healthier and reviews to give you some new ideas.

Easy Purple Polenta Meal

Posted by Ann | Posted in All Recipes, Ann's Favorites, Meal Recipes | Posted on 20-08-2009

Purple Polenta


Regarding the Food Network, I like to eat more like Giada, but today I feel more like a mix between Sandra Lee and Rachael Ray.  This meal is semi-homemade and takes about 30 minutes!  One of the reasons it’s so quick is because I used a bottled sauce.  It’s awesome though, Mother Earth Organic Tomato Basil imported from Italy.  I would not use most bottled sauces as they really are not very good.  If you can’t find Mother Earth Organic (at Whole Food’s and locally in the health section at Hy-Vee), Lucini’s Creamy Tomato Ricotta sauce is excellent as well!  I also like to make my own sauces but it’s just hard to find the time sometimes!  Of course, if you have the time, make your favorite sauce!  This was so good the first time that I had to make it twice in one week just so I could take a picture of it and post!  The first time I made it I used the remainder of the local American Italian Heritage Society’s sausages, which are amazing but alarmingly full of fat.  I swear it’s 50%.  I can’t stand chewing on fat and end up spitting it into my napkin.  So, the second time I made it (pictured), I bought the sweet Italian turkey sausage made without hormones or pesticides.  Much healthier!  However, with less fat, I do prefer the flavor of the good stuff the local Italians make!

If you’ve never made polenta before, don’t be intimidated because it’s super-easy.  But done right, it’s a little time consuming.  You can buy regular corn meal, but I like to buy the medium to course grind corn grits which just takes a little while longer to soften, but it brings a different texture dimension to the polenta.  Also, you can make your polenta with just water, but I prefer to use chicken broth.  It only adds a little bit of flavor, it won’t taste like chicken broth, but what it adds always goes with what I’m making!  By the way, I like my polenta soft, not hard.  Most people think polenta comes in tubes that you slice and fry.  I’ve tried that before and didn’t like it at all!  You can make your polenta soft, and then you can fry the leftovers the next day if you want!  It tastes a million times better than the store-bought tubes.  Part of my reasoning for making it purple (using blue cornmeal) other than the usual added antioxidants in colorful food, is that my son lately will eat purple food.  It’s funny, he won’t eat carrots or peppers, but will happily munch on purple carrots or purple peppers, which are milder than the green variety.  Sure enough, he chowed on this meal, but won’t eat yellow or white polenta!  My husband and I like to drizzle extra virgin olive oil (I’m partial to evoo from Spain) on top of most of our Italian dishes, and it’s really cute because our son will wait eagerly for his olive oil drizzle before digging into his food.  However, he still steals my plate and eats my food because it’s most always better than his…even though it’s exactly the same.

Ingredients: (for 3, double for 4-6 people)

  • 1 cup blue cornmeal…yes it is called blue, but it looks purple to me!  Lavender to be exact.  Lavender Polenta doesn’t sound very good though.
  • 3-4 cups chicken broth or water, for simplicity, I buy the 4 cup boxed organic chicken broth and usually use most of the box.
  • 1/2 cup freshly grated parmigiano reggiano - the imported real stuff tastes better than regular Parmesan (without the reggiano behind the name)
  • Olive oil
  • 1/2 jar (Mother Earth Organic tomato basil sauce) jar sauce
  • 3 turkey Italian sausages - sweet or spicy
  • 1 TB butter
  • salt to taste
  • lemon basil or basil - lemon basil is delicious- it’s basil that tastes like a little lemon rind flavor found its way in, that’s what I used, again from the farmer’s market

Method:

  • Boil 3 cups chicken broth, whisk in blue cornmeal, add butter and reduce to simmer.  This needs to be babysat, constantly whisking and stirring the mixture which will bubble.  If it gets tough to stir, add a little more chicken broth
  • Meanwhile, on a skillet  on medium-high with a little bit of butter or butter spray, brown the edges of the sausage, continue cooking for about 10 minutes, remove from heat and slice sausage and return to skillet - until sausage is cooked through and browned nicely on the sides.  If there there is liquid leftover from the sausage that doesn’t cook down, just drain it
  • (remember to stir polenta) reduce sausage skillet heat to low and after a couple of minutes add the sauce, rip up some lemon basil or basil leaves, about 7-10 and stir in with the sauce
  • After about 30 minutes of the polenta cooking - do a taste test and make sure that it has softened - it shouldn’t be crunchy but it still has some depth to it, turn off the heat, add1/3-1/2 cup parm, a drizzle of olive oil (1tsp-1tbsp), salt to taste
  • Serve polenta on plate and top with desired amount of sauce with sausage, top with freshly grated parm and drizzle with olive oil. 

My favorite way to eat polenta is with rabbit and gravy but it’s very time consuming.  I’ll make sure to post a recipe for that eventually.  From many of my friends, I get asked to make some less “healthy” things - see, this would qualify even though it’s healthy!  They’re basically asking me to sometimes not bake foods with scary sounding ingredients:)  Well, I hope this is less scary for you!
Yummy Earth Organic Lollipops Review

Posted by Ann | Posted in Reviews | Posted on 17-08-2009

Yummy Earth Organic Lollipops

I felt that these Yummy Earth organic lollipops deserved a shout-out from me.  First of all, they are a lifesaver when I go anywhere with my two-year old.  Here’s the thing: before I had O, I was slightly more superior than I actually am now.  Don’t follow?  Okay, “my kid is going to love his vegetables and not eat fried foods and won’t have a pacifier after he’s one, blah blah blah.”  Ha!  It’s not like my child is influenced by other children since he’s mostly home all the time.  Now, I can’t really complain too much since he’s a wonderful fruit eater, he’ll have some of my green shakes (lots of good veggies in there), he drinks juice with vegetables, and he will snack on lots of purple veggies and thinks corn on the cob is fun.  But still, I do think that kids are born with sensitive palates and learn slowly what foods are okay to eat and taste good to them.  I put quite a lot of effort into making sure he gets a balanced diet and plenty of nutrients.  However, when we go out in public, there is no way I’m going to be nutty about everything he eats and not allow him to have what other kids are eating or the restaurant menu items.  I had some friends growing up whose parents did that and they rebelled afterwards.  Not a good idea in my opinion!  Most of us ate plenty not-so healthy foods growing up and we’re all fine! 

Anyway, back to those lollipops.  They are such a lifesaver.  First I’ll tell you why I like them.  There are no artificial colors, flavors, or corn syrup; they’re organic, gluten free, peanut free and nut free.  They’re roughly 23 calories a pop.  I don’t usually eat lollipops, but my son likes to share, he’s very sweet.  So, I have tried all the flavors and to be honest, they’re excellent!  Fantastic taste for every flavor I’ve tried except one: Pomegranate Pucker - that’s the only one that I think tastes like medicine.  It takes O a little longer to finish that flavor and it brings to mind that last year I noticed a big container of these lollipops by a receptionist for the taking for any client.  The only flavor left was the Pomegranate Pucker…Hmmm, I am aware there must be plenty of people that love this flavor, but I have noticed it’s not just me that feels less than enthused with this particular flavor!  Oh well, O eats it eventually and so I don’t feel like I’m wasting money.  Note: the blueberry flavor is strong and the scent fills up small spaces.  I like the scent though so it’s okay.

I only allow O one per day if we go out-  if we stay home, he doesn’t get any.  Not sure if this is really a good idea because now he thinks every time we go anywhere he gets one.  This is a vicious cycle amongst many moms I’ve noticed.  Look around at the kids at your grocery store or mall.  Many of them will have suckers in their mouth because it’s a cheap and fairly long-lasting way to keep your kid behaving in public via parents’ bribing.  Other kids walking around innocently and behaving well then notice kid with lollipop and start whining.  Life is not fair.  Why does that kid have a sucker and I don’t?  No fair.  My mom is mean.  I feel the unfairness escalating.  Waaaahhhhh!!!  No worries though!  Mom has a secret stash of lollipops in purse, here you go.  Ahhh, peace and quiet.  See, I did not start the cycle, but O caught on and started it up himself and I found bribery to be the easiest solution, which I don’t feel too badly about since I think these lollipops are a fantastic solution!  Eventually I’ll figure out a new plan, which will be much easier when he can communicate better with words.  As of now, I usually wait until we actually get into a store to give it to him.  They keep him occupied and happy until he decides to chomp into them.  At which point he usually spits it out in my hand and I have to get the Wet One out and wash our hands and my arm where it at some point touched and is now sticky, and his face and find a trash bin somewhere.  Then, he is well aware that is his only one and is satisfied with the snacks I brought for him (I’ll have to share those at another time!).

Well, there are many other flavors and types of candy that Yummy Earth offers, but I haven’t tried them.  I’m most interested in trying the blood orange flavor.  If you have tried them or have any stories about these, I’d love to hear!

Garlic Parm Lemon Chicken

Posted by Ann | Posted in All Recipes, Meal Recipes | Posted on 13-08-2009

Photo by Roland A Manarin

Photo by Roland A Manarin


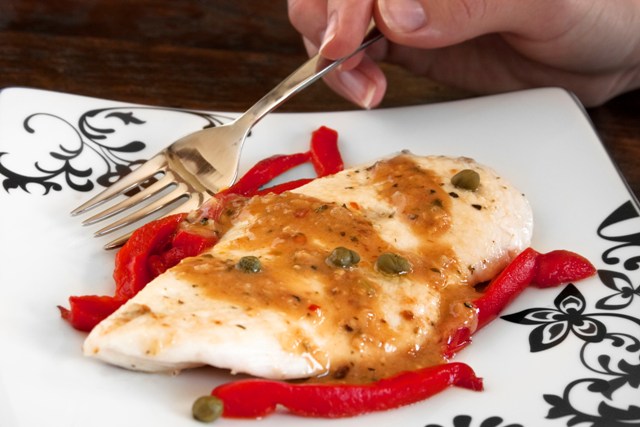
Say hello to my hand!  Excuse me, above is my first “hand shot” so I was excited about it - it was fun!  I have more fun taking photos of the pictures when my brother is the one doing it and not myself.  If you read my last post, you’ll know that this is a recipe using Saucy Mama’s Parmesan Garlic Marinade.  With my Italian roots, I get extra excited about the Italian stuff, and also extra picky.  This marinade is surprisingly (to me) tasty!  An excellent Parmesan garlic flavor, just what it says!  It also had a sort of creamy Caesar dressing kick most likely from the anchovy in the ingredients.   And, I like that it’s a marinade rich in flavor, and not a heavy sauce meant to drown your pasta.  Delish!  I usually make my own sauces, but they can be time consuming and this is so much easier AND good.  Yay!  One of my favorite dishes at the best Italian restaurant in Omaha, Pasta Amore, is their light and flavorful Chicken Picatta.  Now, I am going to try to emulate that soon, but this recipe is inspired by that delicious picatta.  This is more of a merging of chicken picatta meets Saucy Mama’s Parmesan Garlic Marinade, and it works beautifully!  Oh, and be sure to look below to comment for the giveaway!!!

Saucy Mama Parmesan Garlic Marinade

Ingredients:

  • 3/4 lb chicken breasts, sliced thin (4 pieces)
  • 1 roasted red pepper (I prefer Roland brand…not because every other man in my family is named Roland, but because of the flavor) 7.5oz bottle
  • capers
  • 1/2c or more Parmesan Garlic Marinade (Saucy Mama!)
  • juice of 1 lemon, squeezed

Method:

  • You may need to butterfly the chicken or pound it between sheets of parchment in order to make it thin.  I started with 4 already thin breasts and pounded them down for a bit with a utensil not meant for flattening meat, but I seem to have lost my meat pounder.  Meat pounders work much much better, fyi.
  • Cover the chicken with Parmesan Garlic Marinade and allow to marinate in the fridge at least 10 minutes
  • Pre-heat a pan on medium-high heat, add olive oil and allow to get hot, add chicken and cook 2-4 minutes on each side, the thinness of the chicken allows it to cook much faster.  Make sure you don’t overcook so the meat isn’t tough.  It’s a perfect soft and flavorful chicken breast when cooked the right amount of time.
  • Slice the roasted red pepper into thin strips
  • Remove the chicken when done and set aside
  • In the same pan, add 1/2 cup marinade and the juice of one lemon, allow to boil, and then reduce heat to medium-low and allow to thicken, just a few minutes - taste test the sauce, if it’s too lemony for you, add more marinade and vice versa.  I like the strong lemon flavor much like a picatta
  • Plate the chicken, pouring desired amount of sauce on chicken/plate and equally distribute pepper strips and some capers on each dish

Onto the giveaway!!!  As mentioned in my previous post, the giveaway is 4 bottles of Saucy Mama’s (spicy hot) Lime Chipotle Marinade.  Just leave a comment below and to double your chances you can also comment on the Asian Cornhusker Salad.  Depending on the amount of comments, I may just split it up and choose 2 winners that will receive 2 bottles each.  To make it fun you can tell me what you might make with the Lime Chipotle Marinade, but if you’ve already done that on the corn recipe, well, just say whatever you feel:)  I will choose a winner or two via random.org next Wednesday, August 19th.

Update!  Random.org picked #17 and #21 - Congraulations Tony and Ingrid!

Asian Cornhusker Salad

Posted by Ann | Posted in All Recipes, Side Dishes | Posted on 10-08-2009

Photo by Roland A Manarin

The inspiration for this yummy corn dish comes from this new line of sauces and condiments called Saucy Mama.  I was lucky enough to be one of 25 bloggers out there to get a nice big boxful of sauces to try out (in addition to 4 extras for a giveaway for you!)  I wanted to make something non-intimidating that people could take to a barbeque as a side dish or throw it on top of some great Asian salmon or chicken.  Also, as I have mentioned, I live in Nebraska!  Omaha to be exact, but farmers from all over the state drive to Omaha for farmer’s markets and random stands set up all over the place.  This leaves us with some of the best tasting sweet corn in the world at our fingertips daily.  How can I pay homage to our fantastic corn farmers and state?  By naming this dish after them of course.  Well, and that darned football team that steals my husband away every season.  Love the corn, could do without the football due to the husband snatching.  The Cornhusker’s also produce crazy fans who like to talk smack and annoy the crap out of me.  Believe me, I’ve tried very hard to care about football but I just can’t do it!  I get myself pumped up for tailgating food (and the wonderful people we tailgate with have wine so I’m happy).  But when the game starts I’m basically good to go!  Home.


Saucy Mama Sesame Ginger Dressing


Ingredients:

  • 3 cups fresh grilled corn kernels, cut from cob
  • 2-3 green onion stalks- green part only, sliced into thin rounds
  • 1/4-1/2 cup Saucy Mama Sesame Ginger dressing (or as a subsititute, your own favorite sesame ginger dressing)
  • 1/2 cup sliced tomatoes (I used cherry)
  • 2 celery stalks, chopped finely

Method:

  • Grill the corn (for extra flavor, you can coat it with some butter, salt and pepper)- my favorite method is using our outdoor grill at about 325 for 8 minutes turning frequently.
  • Cut the kernels from the cob (my mom gave me the advice of using a mechanical knife, I felt like a man in his tool shed, it was so much fun!)
  • Put corn in refrigerator until cooled
  • Add the rest of the ingredients and enjoy!

So, back to the sauces!  I’m going to host a giveaway of 4 bottles of Saucy Mama Lime Chipotle Marinade (it’s spicy:)  Look out for my next post, which is a Lemon Chicken with the Saucy Mama Parmesan Garlic Marinade.  The giveaway will be officially underway on that post and that’s where you can comment to win!  My husband likes it when I cook with these sauces due to the name.  He likes to ask if I’ve put any Saucy Mama on it even when it’s obvious that I didn’t.  Men:)

Wait a minute, I just changed my mind, if you comment on this page, you’re also entered to win - and you can comment on the Lemon Chicken post too!  Double your chances man.  For fun, you can tell me what you might make with the Lime Chipotle marinade!

The Nutella Challenge: Nutella Sandwich Cookies

Posted by Ann | Posted in All Recipes | Posted on 05-08-2009

Nutella Sandwich Cookies

Oh, I have so many ideas for Nutella it’s not even funny.  It’s pretty dangerous for me to have a jar of it at my house as it is one of my many weaknesses.  But that did not stop me from stepping to the plate when bell ‘alimento suggested a Nutella Challenge (you see the pretty jar of Nutella in the side bar?).  I happily went and bought the two gigantic jars at Costco, which I’m sure is not necessary since a little Nutella goes a long way.  Originally I wanted to do some Nutella Swirls/Pinwheels (which I think I will still do soon anyway) but the cookie batter I made wasn’t quite right.  Previously, I made these hazelnut meal cookies- which are awesome.  I wanted an excuse to make those again, so I changed the recipe  to make flatter, crispier and less sweet cookies (since Nutella is so sweet).  Then, I tried to do a dollop of Nutella - sorta like the Hershey kiss cookies, but of course since I made this batter to be thin, it didn’t work out - my fault for changing the plan after making the batter.  However, the flavor was excellent so those are already gone:)  Then I burnt the first batch of  regular cookies by not checking the time.  But then, the last two batches worked!  Phew!  I thought they weren’t going to stick together, but once they cooled, they were just fine!  A little delicate, but completely tasty and delicious.  Yay! 

I received a gallon of palm oil shortening in the mail from Tropical Traditions, and I wanted to try out a recipe using it, there will be different recipes to follow and a giveaway as well.  I made these cookies with the intention of a healthier version of Nutella sandwich cookies.  With gluten-free oats, these are also gluten-free!  There are plenty of recipes out there for Nutella sandwich cookies, but I haven’t seen one like this yet.  The ones that usually catch my eye are the hazelnut meringue Nutella sandwich cookies.  Talk about melt in your mouth!

Ingredients:

  • 1/2 stick butter (1/4 cup)
  • 1/2 cup palm oil shortening (non-hydrogenated) - you can also use coconut oil or butter - DON’T use hydrogenated shortening!
  • 1/2 cup sugar (I used organic)
  • 1 TB agave nectar
  • 1 egg
  • 1 tsp vanilla
  • 3/4 cup oat flour
  • 3/4 cup hazelnuts, roasted, blanched and then finely ground in food processor
  • 1/4 tsp salt
  • 1/4 tsp baking powder
  • Nutella

Method:

  • Pre-heat oven to 350
  • Toast the hazelnuts in the oven roughly 8 minutes or until you can smell them, don’t let them burn!  I like to toast extra in case of duds.
  • Remove the hazelnuts from the oven and with a towel, rub as much of the skins off as possible (on is okay if you don’t feel like doing this)
  • Grind them in a food processor until finely ground- it’s not going to look like flour- it’ll be slightly lumpy
  • Cream sugar with butter and shortening, add egg, vanilla and agave nectar and mix
  • In a separate bowl, combine oat flour, hazelnut meal, salt and baking powder, mix and slowly combine with wet ingredients
  • Refrigerate the batter for 20 minutes, try not to eat all the dough.
  • By small cookie scoop-full, place batter roughly 2 1/2 inches away from each drop since dough will spread.
  • Bake 5 minutes or until edges are slightly brown.  Allow to cool slightly and carefully transfer to cookie rack.  Allow to cool completly before adding Nutella
  • Take about 1/2 cup of Nutella and warm it in the microwave or stove until it’s easily spreadable (Nutella is too thick for these cookies and spreads much easier warm) - no need to measure, spread a little and sandwich those cookies!   

Coombs Maple Review and Giveaway!

Posted by Ann | Posted in All Recipes, Reviews | Posted on 03-08-2009

Coombs Maple Syrup

You may have read my last recipe blog post, about the pumpkin cookies.  I used the Coombs Family Farm’s maple syrup and maple sugar to add some extra flavor to the cookies.  However, after doing so, I didn’t want to use my maple syrup in recipes anymore because it’ so darn good that I want to savor the flavor on my pancakes in the morning instead.  You know how pure maple syrup is typically fairly mild in the maple flavor department.  The fake stuff seems to have more maple flavor than the real stuff?  How can that be?  Well, I felt pretty stupid after checking it out on the Coomb’s website.  Typically, you’d think Grade A is better than Grade B?  Well, it is in school anyway and so I have a feeling that Grade A flies off the shelves faster with most people thinking it’s higher quality; leading many grocery stores to only carry Grade A products according to consumer demand (at least in Omaha, I’m sure people are a little more informed out East).  Makes sense.  I’m pretty sure I’ve only ever had Grade A because I didn’t have a choice at any of the local grocery stores.  If I did, maybe I absentmindedly picked A without putting in much thought.  I received their Grade B version and was in immediate maple HEAVEN!  It is really the best maple syrup I have ever tasted with a robust maple flavor that will make true maple lovers smile.  Plus, it’s organic which makes me happy since I only ever buy organic maple syrup.  Anwyay, Grade B only means it has a stronger maple flavor and has nothing to do with lesser quality.  I think this rating system should be changed!  Quite a few years ago, when I made the switch from the fake syrup to pure maple syrup, I was a little disappointed in the mild maple flavor.  I got used to the change quickly and the fake stuff started to really just taste fake to me.  But this Coomb’s Grade B maple syrup is definitely the perfect solution.  I wish I had this first, I would have saved a lot of money searching for the perfect maple syrup and never finding it.  Previously, I had been settling on Grade A dark amber because it had the most maple flavor from my grocery store options. 

Coombs Maple Candy

Coombs also sent me some maple sugar and maple candy.  First I’ll discuss that candy.  Oh my goodness, pure maple flavor in a mouthwatering piece of soft candy that melts right in your mouth as you chew.  Yep.  Seriously.  Anyone seen that Friend’s episode where Chandler books a romantic trip to Vermont intending to take Monica but Ross ends up going instead and goes crazy eating maple candy?  Hilarious, I hadn’t thought of that episode in a long time but the memory came surging back when I took my first bite.  Well, it’s different maple candy that Ross ate but had I received a package of multiple candies, I may have done the same thing.  I don’t blame Ross at all:)  I received the maple man, but the leaf is bigger and they also have bon bons which I can only imagine how those taste!  My son also loved the maple man and did his best to steal the candy from me!  In the interest of my son not eating too much sugar, I gracefully ate most of it….well, maybe that’s part of the reason?  The maple sugar is also pretty amazing!  The maple flavor is quite strong, just as it is in the candies and syrup, but the sugar is in fairly large crystal form.  I’d like to make a big sweet pretzel and sprinkle those sugars on top to add some great texture and flavor.

I also received an interesting article that I wanted to point out before I get to that giveaway!  It’s about making maple candy, of course this article caught my eye after eating that delicious candy.  The article is from Hallmark Magazine with instructions from Coombs on how to make the candy in the snow.  Pack some snow outside like a snowball (I’ll make sure to do this in the front yard to avoid any dog yuckies).  Just heat some 100% pure maple syrup (I’d go with Grade B) to 233 degrees Farenheit without stirring, if any bubbles pop up, throw in a little vegetable oil.  Pour the hot syrup into the snow in swirls.  It should harden right away, if it sinks, it needs to thicken longer on the stove.  How cool is that?!  I’m so excited for our first snow now!  …in a few months.

On to the GIVEAWAY!!!!  Coombs will send you exactly what I got!  Maple syrup, maple candy and maple sugar!  All they ask is that you check out their website and comment on either the company, recipes or blog.  It’s actually a great site with some fantastic looking recipes and useful information…such as the Grade B knowledge.  I will choose the winner at random via random.org.  I’m excited to hear your comments, happy winning!

UPDATE: Random.org picked #5 and that’s Angela, congratulations Angela!  I’m sure you’ll enjoy your delicious maple products as much as my family has (the syrup and candy are already all gone!)

Blog Widget by LinkWithin