Welcome to my food blog!

Featuring delicious recipes made healthier and reviews to give you some new ideas, plus, some toddler food ideas.

GF Chocolate Chip Cookies & Happy Halloween!

Posted by Ann | Posted in All Recipes, Cookie and Bar Recipes | Posted on 31-10-2009

Gluten Free Chocolate Chip Cookies

We all know Alton Brown is the man.  So, when I realized he had a gluten free chocolate chip cookie out there- I thought, “that’s the perfect recipe to tweak!”  I really set out to add some chopped hazelnuts to them but my hazelnuts were bad so I threw in some optional walnuts instead.  Hazelnuts would have been perfect with these though.  The cookies turned out great and I’m really excited to now use my base recipe and keep playing with it.  You can’t tell they’re gluten free and I like them better than the Betty Crocker mix - they’re not as dry and they don’t fall apart easily.   I sort of feel bad making something sugary on Halloween, but I’d rather eat these than candy.  I’m finally growing up!!!  Kind of…look below for some pictures from last night’s Halloween party at a friend’s house!

Ingredients: (recipe adapted from here)

  • 2 sticks butter (I was going to experiment with applesauce but I’m out, I imagine less butter would have been fine - 6oz?)
  • 1 1/2 cups brown rice flour
  • 1/2 cup oat flour (make sure to buy gluten free oats for gluten free cookies)
  • 1/4 cup cornstarch
  • 2 TB arrowroot powder
  • 1 tsp ground flax seed (for gumming agent reasons)
  • 1 tsp salt
  • 1 tsp baking soda
  • 1/4 cup concentrated fruit juice blend
  • 1 cup light brown sugar (used organic to make myself feel better that I’m using this much sugar)
  • 2 eggs
  • 2 tsp vanilla
  • 12 oz chocolate chips (I only had minis this time)
  • 2/3 cup chopped walnuts (optional, I’d rather have had hazelnuts)

Method:

  • Pre-heat oven to 350
  • Soften butter, then mix with sugars, eggs, and vanilla
  • In a separate bowl, mix dry ingredients (except chocolate chips) with a fork
  • Slowly mix dry into wet ingredients - add chocolate chips and nuts
  • Chill at least 1/2 hour
  • Line cookie sheet with parchment paper and by small cookie scoop full, drop batter on parchment paper- no need to press down, refrigerate unused dough while baking
  • Bake 9-10 minutes or until edges turn golden brown - top will appear slighlty uncooked but remove, let sit 2 minutes and it will cook all the way through and stick together.
  • Cool on wire rack
  • Note: Alton had oven temp for his recipe at 375 - this cooked the edges too fast for my version so 350 works better.

Charlie and Maverick

On a side note…Happy Halloween!  Halloween parties are so much fun!  I think it would be nice to go to a costume party every few months.  At the party last night, I met some of the same people I met last year at the same party - however, I don’t remember any of them because nobody looks the same.  Everyone goes all out and it’s so fun to see the creativity.  As a girl, you have to get creative if you don’t want to be the “sexy” version of anything you can think of.  It’s practically impossible to find a costume that isn’t a sexy version!  I think men must be making all these clothes thinking women like it or something.  What do you think?   By the way, that’s my husband with me up there- it makes it so much more challenging to think of a “couple” costume.  Some great couples costumes from last night: Biggest loser before and after (husband padded with cotton wearing a wig and makeup as before), wife is after, Ghostbuster and Stay Puft Marshmallow, Octo Mom and Sperm Donor, Marilyn Monroe and Joe DiMaggio, and  Richard Simmons and Suzanne Somers.  Tonight, our little man is going to be a cowboy and say, “Tiii or Teeeee” to get his candy - I’m pretty excited to see how he does!  However, I’m hoping I can hide it from him after tonight but we’ll see how that goes.  Some of the candy out there is pure fakeness so I’m hoping to weed through it and throw most of it back in our bowl to hand out..  Shhhh.
Maqui Berry, the ORAC Value and You

Posted by Ann | Posted in Reviews | Posted on 28-10-2009

Maqui Superberry Picture From novelleinternational.com

I was feeling pretty tired and low energy yesterday but when I saw the UPS man come to the door I got a little thrill of adrenaline - my Maqui Superberry finally arrived!  Seriously, I jumped up a few times like a kid.  These are the kinds of things that excite me.  The maqui berry is the highest known antioxidant superfruit out there.  It surpasses acai, pomegranate, wolfberry (goji), mangosteen, noni, and any others you can think of.  Lots of companies charge big bucks for their high antioxidant mixes and the variety is huge, but the maqui takes the prize.  Of course, every one of these fruits offers slightly different benefits - but when you solely look at the ORAC value - maqui is at the top.  What is the ORAC value?  ORAC stand for Oxygen Radical Absorbance Capacity.  The best scientific study published that I found explaining this is from the USDA - click hereThe article even has a huge chart showing different ORAC values of foods per 100g.  However, it is quite lengthy and from 2007 - so I’ll just try to sum up what it means without writing a thesis - though if I had to this would be my topic of choice if I were getting a PhD!  A free radical is a chemical molecule  that possesses an unpaired electron in its shell.  They are highly reactive and looking to attach that electron onto an otherwise healthy molecule in your body - such as DNA, lipids, carbohydrates or proteins.  They destroy the electron on the healthy molecule, and then that becomes a free radical.  It’s a chain reaction and the free radicals re-produce while disrupting previously healthy cells (Source 1).    Having said that, it is normal to have free radicals and they are not always bad, as some cells generate free radicals to kill invading pathogens (Source 2) - but obviously free radicals can cause a lot of damage in the body.  Antioxidants, by destroying free radicals, may help cancer or help prevent cancer and slow aging (Source 3).  

Last month I went to Whole Foods and almost bought the Maqui Superberrysupplements but got talked into something else from the sales lady.  With all of the viruses running rampant around here, I figure I need to pump my body’s antioxidant supply since I may not always eat the perfect daily menu!  I came home and regretted my decision and wished I had bought the Maqui - but then a couple of days later I get an email from them wondering if I’d like samples.  Crazy, of course!  It was meant to be:)  So I receive my samples and open up the informational packet to see the owner of the company, Novelle,  is a woman named Annie Eng.  She grew up in Malaysa, graduated from U of Wisconsin at Madison with a degree in accounting and finance.  A woman after my own heart as I went the business route as well.  Anyway, she was a successful Investment and Financial Consultant until she became inspired to work with previously unknown health benefits of certain plants.  This particular berry, maqui, is found in the Patagonia region of Chile, where the company employs the native Mapuche Indian community, who are essentially sharing their native maqui berry with the world.  The process is completely sustainable and organic - so you can feel better about drinking it.

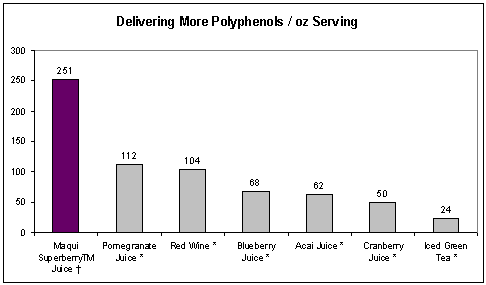
I received the Maqui Superberry Superfruit Energy vitamin B blend drink as well as the Maqui Superberry concentrated drink.  The vitamin B blend drink tastes a little bland just mixed with water so I put a shot of grape juice in it and it tasted much better.  B vitamins make me flush and give me energy so I think the drink did the trick along with a huge antioxidant punch.  For a daily dose of Maqui, I prefer a shot of the concentrate.  They only recommend a tablespoon per day and the flavor is just a strong berry taste - not near as sweet as POM Wonderful - which I think is too sweet anyway and dilute that with sparkling water.  The Maqui Superberry drink is sweetened with a little agave nectar.  According to Novelle’s research on Maqui and other comparative high ORAC value competitors, it seems as if POM Wonderful is always the second highest ORAC product.  This surprised me as Acai products research previously fooled me into thinking they were superior!  In order to get similar benefits from POM Wonderful, you just have to drink more.  I prefer a tablespoon of this Maqui though!  Maqui Superberry has two different types of antioxidants called polyphenols (think Alton Brown on theWelch’s commercial) and anthocyanins.  Plants produce anthocyanins to protect themselves against diseases, sun, irradiation and other biological enemies.   Maqui is also abundant in vitamin C, iron and potassium.  Click here for more health benefits.

Delivering More Polyphenols


And my favorite ORAC chart is here: http://www.novelleinternational.com/maqui-superberry-brunswick-laboratory-tests.html - check it out.

My take on this is that it’s absolutely worth it.  If you can’t afford it, you can buy yourself some POM Wonderful instead though I do prefer the down and dirty tablespoon shot of this. You’d have to drink more POM to make up for the ORAC difference but since POM has been around longer and therefore spent more advertising dollars - it’s easier to find and cheaper since the pomegranates are grown in California and can be found around the world.   With PW, you drink more to get the same benefits and then are getting more sugar and calories.  Of course, if you’re that worried about it you could just buy the capsules instead.  I wouldn’t discount all the other super-fruits though.  Everything reacts a little differently in our bodies and science hasn’t had the time to study it all.  I often add frozen acai to our smoothies in the morning amongst other super stuff.  After writing all of this, I’m hoping I just made sense and it wasn’t all complete gibberish.   I’m not getting paid for this!  But I did get some free product which is pretty sweet.

Disclosure: I was provided free product from Novelle

Sources:

  1. http://www.doctorslounge.com/primary/articles/freeradicals/freeradicals1.htm
  2. http://www.vivo.colostate.edu/hbooks/pathphys/misc_topics/radicals.html
  3. http://www.cancer.gov/cancertopics/factsheet/prevention/antioxidants
  4. Graph source: http://www.novelleinternational.com/maqui-superberry-product-comparison-graph.html

PAMA Tiramisu Chilled Affogato

Posted by Ann | Posted in All Recipes, Cookie and Bar Recipes | Posted on 21-10-2009

PAMA Tiramisu Chilled Affogato

I’m seriously happy.  These are awesome.  They’re a winner in my book whether or not this recipe wins a prize - If I were a judge I’d give this my vote!  Mmmm, a little alcohol, espresso, gelato and chocolate never disappoints me.  Ever!  PAMA Pomegranate Liqueur is doing a contest right now - develop a recipe with at least 3 tablespoons of PAMA, submit it to their facebook page, and the grand prize winner gets a trip to Aspen for the Annual Food & Wine Festival.  Are you kidding me?  That would be amazing!  My husband and I wanted to go this last year but never made the arrangements - he, because he was worried about his studies that are now over, and myself, because I was worried that I would be pregnant.  What does that matter anyway?  Unless I’m 9 months ready to pop.  Actually, that would be very funny if I won this contest and happened to be pregnant and due in June.  Right now, it’s all up in the air.  To my knowledge, I may still have caffeine and alcohol, which is lucky for me for this particular delicious dessert!  Maybe even still in June…you just never know:)

I want to tell you an embarrasingly funny oops story which led to a great ending.  Or just plain stupid story.  What was I thinking?  That’s right, I wasn’t thinking.  I have one of those old school espresso makers that you put on the stovetop.  I also have the Bialetti cappuccino maker as well.  I am so used to making the cappuccino that when I was in the process of making espresso I took out the milk and filled up the container with milk instead of water.  It brewed up nicely actually and I should’ve just drank it.  I added the PAMA liquer while it was still hot and it curdled into nasty bits and just looking at the mess made me want to spew.  Reminds me of the brains shot someone bought me the day I turned 21.  Anyway, it was a sad waste of some good PAMA and espresso beans.  Instead of starting from scratch, my mom suggested that I use the illy espresso can I had in my fridge.  Brilliant!  Thanks mom.  Originally I was planning on a more traditional affogato but due to my fortunate dumb mistake, I used chilled espresso and I liked it better!  The gelato didn’t melt underneath but instead when mixed, made more of a milkshake consistency.  I liked this far better than any milkshake I’ve had, however.  I’ve already had a few of these and as I’m writing this…I’m drooling.  I’m Pavlov’s dog.  Will do anything for this dessert.

Some of the judges in this PAMA contest are Spike Mendelson, Lee Ann Wong and Jeff McInnis from Top Chef!  I’ve watched that show since season one with Katie Lee Joel - I thought she was fantastic but Padma is pretty amazing herself- it’s a great show so I’d watch it either way.  Wouldn’t that be cool to have some Top Chef contestants try your food?  Actually, I’d rather eat their food but nobody lives in Omaha.  Come on everyone, come to Omaha!  We have a great local economy and it’s a nice place to start a family.  I’ll eat your food.  Back to the subject- I went Top Chef and did all my shopping at Whole Foods for this.  I even timed myself  and dashed around sweating all over the place in a panic.  No, I didn’t do that.  But I did get everything at Whole Foods.

Ingredients:

  • 1 cup espresso gelato - NOT mocha, cappuccino or coffee gelato - I used Ciao Bella brand
  • 1 cup vanilla or mascarpone gelato - I got this from the gelato counter
  • 6 ladyfingers - WF doesn’t carry the good Italian imported big and fluffy ones, but it’s okay b/c these little ones are perfect for the little cups - I wouldn’t want these for actual tiramisu though.
  • 6oz chilled espresso - I used a can of Illy espresso and had a swig first
  • 1 pomegranate - seeds  click here for the best video I think for opening and cleaning pomegranates
  • 1 cup whipping cream
  • 4 tsp powdered sugar
  • 2 tsp mascarpone
  • 4 6oz cups
  • Chocolate bar -a minuscule amount - I used 58%

Method:

  • Cut and clean the pomegranate according the the video link above
  • Whip the cream with the powdered sugar and mascarpone, set aside
  • Mix chilled espresso with PAMA liqueur in a pourable container
  • Scoop about 1/4 cup vanilla or mascarpone gelato on bottom of each cup
  • Scoop about 1/4 cup espresso gelato on top
  • Crush and crumble one ladfinger per cup on top into chunky bits
  • Pour about 1/4 cup liquid on top - some liquid may be leftover depending on your cups
  • Top with about 1/4 cup whipped cream
  • Grind chocolate on top
  • Sprinkle pomegranate seeds on top - in the picture I only had a few but before eating, I put in about a quarter of the pom.  I like different textures in my ice cream, but if you don’t - you can omit this.  I think it compliments the flavor of the PAMA as well.
  • Break 2 remaining ladyfingers in half and place in each cup.
  • Serve- there is no major hurry to eat these since they’re not made with hot espresso- the gelato melts a little which only makes it melt in your mouth even more.  It turns into somewhat of the consistency of a milkshake - but I’d rather have this than a milkshake any day!

Public voting starts November 16th- so put it on your calendars!  Okay, if you remember, and you like this, go to PAMA’s Facebook page and vote please!  Here is the link if it works…I’ll try to update it if anything changes.  Thank you!  http://apps.facebook.com/promotionshq/contests/6690/voteable_entries

By the way…if you’ve never had PAMA, here’s an idea on something else to make with it.  The first time I ever had PAMA was at a bachelorette party.  This was a much nicer version of a bachelorette party and we walked in the house and were instantly served a beautiful silver tray full of champagne glasses filled with sparkling wine, PAMA and a splash of cranberry juice.  All of us girls were quite happy with the drink but unfortunately, they ran out quickly and we switched to wine.  Okay, I was very happy with the wine too!   The sparkling wine/PAMA drink was a great way to welcome a bunch of young ladies.  Guys, you can drink it too, just remember to stick out your pinky finger.   I won’t tell anyone you like it.

Pumpkin Muffins With Maple Glaze

Posted by Ann | Posted in All Recipes, Breakfast Recipes, Cookie and Bar Recipes | Posted on 19-10-2009

Pumpkin Muffins With Maple Glaze


Have you ever had the delicious Pumpkin Loaf from Starbucks?  It has such a strong pumpkin flavor without being overwhelming, a soft, melt in your mouth texture contrasting with a topping of crunchy pumpkin seeds.  My son snarfed that up in two seconds.  I felt so inspired by witnessing the boy gobble up the bread that I wanted to make something comparable yet gluten free.  I can tell you that these pumpkin muffins don’t taste like the pumpkin loaf, but I veered off that track while developing this recipe and personally craved  pumpkin maple muffins with a maple glaze topping instead.  Also, you would never know these muffins are gluten-free!   I used enough liquids in this recipe that the muffins are plenty moist, and day two  they remind me a little of Mimi’s honey bran muffins.  The glaze has the additional maple flavor that I wouldn’t want to do without.  My taste-testers said they liked the muffins solo- but some raved about the glaze (myself included, hate to admit it but I was loving the full of sugar maple glaze!)   You never really know when people are being honest or just nice - but everyone loved them!  My son kept coming back for more and eventually I had to put a stop to it or he’d be up all night on a sugar high!  He’s always honest and never spares my feelings while taste testing anything:)  However, sometimes he just makes a face by the looks of things so I don’t think he’s the most qualified…

Today my son took me on a walk through the neighborhood- it’s one of very few nice day’s that we’ve had in weeks!  I decided to gather up some leaves for this picture.  Thank you neighbors, for letting me walk into your lawns and pick up leaves!  I did feel a little weird walking around their lawns but there were some pretty leaves that complimented the muffins nicely.   

Ingredients:

  • Muffins
  • 3/4 cup almond flour
  • 1/2 cup brown rice flour
  • 1/4 cup buckwheat flour
  • 1 tsp baking soda
  • 1/2 tsp baking powder
  • 1/2 tsp salt
  • 1 tsp cinnamon
  • 1/2 cup coconut oil, warmed up
  • 2 eggs + 3 egg whites
  • 1/2 cup maple sugar (ground as fine as you can get it) - if you have 3/4 cup maple sugar, you can use this and omit the 1/4 cup maple syrup entirely…I ran out 
  • 1/2 cup light brown sugar
  • 1/4 cup maple syrup
  • 1 tsp vanilla or maple flavoring/extract
  • 1 cup pumpkin
  • Maple Glaze
  • 9 TB powdered sugar
  • 3 TB grade B maple syrup
  • 1/2 tsp maple extract or flavoring

Method:

  • Pre-heat oven to 350
  • Mix dry ingredients in a bowl
  • In a separate bowl, beat coconut oil with sugars and maple syrup, add eggs, then pumpkin, then vanilla
  • Slowly beat in dry ingredients
  • Grease muffin pan or use liners - for mini-muffins, I used a small cookie scoop and for the regular muffins I used a medium-sized cookie scoop.  Fill 3/4 way full.
  • Mini-muffins will bake about 15 minutes and regular sized muffins will bake around 25-28 minutes.   Toothpick in center will come out clean.  Do not under-cook (the cupcakes are moist enough that the raw pumpkin flavor will debut which is not good)
  • Remove from oven and let sit a few minutes - transfer and cool on wire rack
  • With a fork, mix glaze ingredients - I used a spoon for drizzle and also a silicone brush

Not only do these muffins get more moist on day two, but the glaze sinks in a bit (I think the muffins absorb the glaze, hence the honey topped Mimi’s style muffin).  So, for the photo above I made even more glaze for the benefit of the camera.  Oh darn, more glaze on my muffin:)

Cannellini Chard Soup

Posted by Ann | Posted in All Recipes, Soup | Posted on 15-10-2009

Cannellini Chard Soup

It’s soup season!  I love soup - love it, and my favorite soup is whatever the heck the people in Northern Italy come up with.  This soup, topped with olive oil and grated parm reminds me of the soup my Dad and I always ordered at this restaurant between Fanna and Aviano.  Of course I can’t remember the name of the place, but it was always packed with locals and the prices were embarrassingly cheap.  The soup there was amazing and we always ordered soup before the meals then wishing we had just ordered another bowl of soup rather than a meal.   I first made this soup a few weeks ago with the addition of fresh basil and fresh parsley - which gives it an added kick.  The only reason I left it out of this batch is that I just plain forgot to buy it at the grocery store.  Darn it.  I always forget one or two ingredients.  This soup is a lot greener with the fresh herbs but still tasty without.  There are a million different Minestrones calling my name, and I intend to make them all someday!

Ingredients:

  • 2 whole carrots (I buy the organic bulk carrots - trust me, they taste much better than the pre-packaged ones, baby or big-boy)
  • 2 stalks celery (optional)
  • 1-2 shallots
  • 1 bunch swiss or rainbow chard - rainbow is pictured above, pre-rinsed and chopped
  • 1 14.28 oz can San Marzano tomatoes
  • 2 15 oz cans cannelloni beans, drained
  • 1 bunch fresh basil (about 1/3-1/2 cup chopped) or 1/2 TB dry
  • 1 bunch fresh parsley (ditto)
  • 8 cups water + chicken and vegetable boullion - I do 1/2 and 1/2 to taste - the amount added will depend upon the brand of boullion you buy
  • pepper to taste
  • freshly grated parm
  • evoo to drizzle on top

Method:

  • In a soup pot, pre-heat the pot on medium-high and add some olive oil
  • Chop up carrots, celery, and shallots - add to pot, stir and cook about five minutes or until some of the vegetables begin to brown slightly
  • Add the water and the boullion, allow to boil until carrots start to become tender
  • Add chard, tomatoes and herbs - cook on low until carrots are completely tender
  • Add cannelloni beans and some freshly grated pepper and serve topped with some freshly grated parm and olive oil…or a big crusty baguette toasted rubbed with garlic and olive oil and toast…yummy….

Produce Bags and Snot Rags…Giveaway!

Posted by Ann | Posted in Food Chatter, Reviews | Posted on 11-10-2009

Love For Earth Hankies

Since we seem to have had a very cool summer, early fall, and generally cooler temperatures - the cold and flu season in Omaha has been chugging away like nobody’s business.  My sweet little two year old son has been a snot-producing machine for a whole month now.  A whole month.  Luckily, the last week it has just been trickling out of his nose, but the last few weeks of September had my little guy experiencing a sinus infection and then a cold back-to-back.  This left him running from anyone holding a tissue.  Seriously.  He’d see the tissue and cry and run away as fast as he could and not stop moving until you surrendered.  This was just after a week!!!  I was feeling pretty helpless and wishing I could buy some super-soft bamboo hankies.  Feeling like I had found the perfect solution in the world, I set out to find them on Google.  Nothing.  Eureka!  Etsy Alchemy.  I love Etsy Alchemy.  If you don’t know what it is, it’s really just a market for buyers to say what they want made specifically for them, and sellers to bid on it for the chance to get your business.  I put out my bid for these bamboo hankies and out of everyone’s responses, I thought Love For Earth seemed like the right fit for me.  Instead of sticking with cotton or jersey, as most others had suggested, she was very sweet and helpful - and open to getting that bamboo as soft as possible for O’s nose.

Love For Earth (Kara) sent me 30 super-soft 10×12 bamboo hankies.  Most places that sell handkerchiefs sold one so I’d have to put in 30 orders.  Seriously, if you’re buying hankies for a kid you need lots of them, one won’t do anybody any good!!!  I’m not even joking when I say that right when O felt these on his nose, he stopped running away from me and stood there waiting for me to get all the snot!  His red nose went away in a day and I’m saving tons of waste from not using near as many tissues.  These are thicker and larger than tissues so they last longer and I don’t go through them near as fast as I thought.  They wash up easily- I wash them on hot to get the germs off.  I’m not too sure why nobody makes these yet, but I’m hoping Love For Earth will start selling these in different colors and hopefully moms will find her and save their children’s noses (and the earth at the same time:)

Kara also sent me a couple of cloth napkins to try out which have been fantastic.  That’s another thing we go through like mad: napkins - cleaning up my son’s face after every meal and snack gets wasteful as well.  Another great product that I think pertains very nicely to this blog is her reusable Produce Bags - they’re pretty and featured in Food and Wine Magazine !!!  How cool is that?  I’d buy some but my produce bags stay in the kitchen and become poopy diaper bags.  We go through them pretty fast.  When diaper days are over I will definitely purchase some of these to save waste!

Love For Earth Produce Bags - photo from Love For Earth

Onto the GIVEAWAY!  Love For Earth has generously provided a $25 merchandise credit to her shop!  You can pick whatever the heck you want!  Even though the hankies are not in her store, she is willing to make them for you if that’s the item you’d most like.  How to enter?

  1. Visit her shop http://www.etsy.com/shop.php?user_id=7364641&page=2
  2. Comment below and tell me what your favorite item is in her shop.
  3. For more chances, you may twitter or facebook this giveaway and make another comment to let me know you did it!
  4. Winner will be picked Tuesday, October 20th at 12:00CST via random.org
  5. Case closed!  Random.org picked 6, congratulations Skinny Plate!

German Plum Cake - Dr. Oetker

Posted by Ann | Posted in All Recipes, Cookie and Bar Recipes | Posted on 10-10-2009


German Plum Cake

One of the best parts of cooking is the memories that certain dishes bring back.  My dad gave me a 5 pound box of Italian Plums from Costco and asked me to make some Plum Cake.  His sister, my aunt Novella, used to make this plum cake and my dad had a craving for it.  However, the particular recipe he was craving calls for 5lbs 8 oz of plums and he had already eaten roughly one of the five pounds of plums given to me.  I figured, oh well, it’s a ton of plums anyway and so it’ll be fine.  Sometimes, you have to just give in to your cravings of exactly what you want and NOT modify the recipe.  Do you know how hard this is for me to do?  To do my best to not modify this?  I figured his craving should be fed properly.  Now, here is the link to the recipe.  If you check out this recipe, you’ll notice it almost seems more like a sweet bread recipe, rather than cake.  Okay, okay, I did modify it a little.  It only called for 1/4 cup of sugar and 1 2/3 cup flour.  I added another 1/2 cup of flour and extra sugar to taste.  Even with these modifications, the dough was still not sticky enough to knead into a ball and roll out.  Instead of adding sugar and flour all day long, I figured I’d just spread the dough onto the pan and add the plums. 

Honestly, I am disappointed in the cake and wishing I’d have made up my own recipe or made one of these: Erna Welp’s Pflaumekuchen or this Italian version.  The Italian version is what I really wanted to make because it has almond flour - which gets me excited and makes me think of all kinds of new ways to make it my own.  Dr. Oetker’s version has an optional crumble topping that my aunt used to add most of the time - but my Dad decided not to have that due to the added bad-for-you stuff.  I have a feeling his craving included crumbles!!!  I have a modified healthy crisp topping from my Apple Currant Crisp that maybe would have actually brought some flavor to this cake!  Having said that…I wouldn’t make this again - even without the added agave nectar - I’d rather have an actual cake bottom rather than a slightly sweet bread “cake.”  Next time my dad finds himself with too many Italian plums, I’m excited to get cooking my own version and I hope it’s as good as I imagine it will be!

So, what did my dad think?  He said the plums on top were delicious, just how he remembered them (baked plums with a little sugar drizzled on top at the end, not too hard) - but the cake he remembers is not this bready cake but actual yellow cake and fluffy as well.  I’m pretty sure my aunt figured out the same thing I did- this particular cake dough recipe isn’t all that great - use actual cake!  And, she must’ve made it extra special sometimes with the addition of crumble topping.  Sigh- in my attempt to make something nostalgic going against what I wanted to do - I learn I should’ve just done what I wanted to do in the first place.  Oh well- I’m pretty sure those plums will be gobbled up in no time with half of the “cake” leftover.

Nature’s Pride Bread - Foodbuzz Tastemakers

Posted by Ann | Posted in All Recipes | Posted on 05-10-2009

Nature's Pride Bread

I’ve mentioned Foodbuzz before, but it’s a wonderful food community where people with a crazy love of food get together and basically check each other out.  Whether you have a blog or not, you can still post recipes on there - so I find it to be a pretty cool site for anyone.  You can click to check them out on the sidebar.  Anyhow, Foodbuzz has a Tastemaker program of which I am very happy to participate.  Basically, I get free samples of food and food-related products and then get to talk about it.  Cool! 

So, I’m pretty committed to my favorite type of 100% whole wheat bread, which is Earthgrains.  The reason that I buy Earthgrains is due to the ingredients inside the bread - and the flavor is excellent.  However, it’s good for me to have a back-up plan, since only two grocery stores that I can think of actually carry my type of bread.  Also, if you’re like me, you end up going to 4 different grocery stores to get everything you like.  Sometimes, I don’t feel like making another stop or just don’t have the time!

I like the Nature’s Pride’s philosophy for their bread- they don’t use artificial colors, artificial flavors, high fructose corn syrup, trans fats or artificial preservatives.  But how does it taste?  Well, I did a  fun little taste test with my regular bread and the two varieties I received from Nature’s Pride- 100% Whole Wheat and 12 Grain.  I sliced them in half, did not toast them, and sampled the three together with my mom and son.  O went for my usual bread, it was pretty cute, I think he knew what we were doing and he took one bite of each and pointed at the usual slice a few times and smiled.  Of course, the Earthgrain’s variety is softer and probably easier for him to eat.  My mom liked the 12 grain the best because of the added crunch.  Both the Nature’s Pride breads had a sort of raw flavor to them.  I’m not sure if it’s the type of vinegar added.  Of the two Nature’s Pride varieties, I preferred the 12 grain as well.  The crunch and the added grains made this one taste a little nuttier and heartier.  They are both fairly heavy and dense breads - and I’d buy the 12 grain again for sure!  How do you like the picture? :)   Since I already had my usual bread in the pantry, I put this in the freezer right after I took out my samples.  I can’t wait to toast the 12 grain - I love the taste of toasted seedy bread with an egg over-easy on top or almond butter.  Yum!

Disclosure:  I was provided free product from Foodbuzz and Nature’s Pride

Blog Widget by LinkWithin